How the Safety Bicycle Reworked the Penny-Farthing
Learn how the safety bicycle changed the rider’s position, steering, and drive path, making the penny-farthing’s tall-wheel layout easier to approach and control.
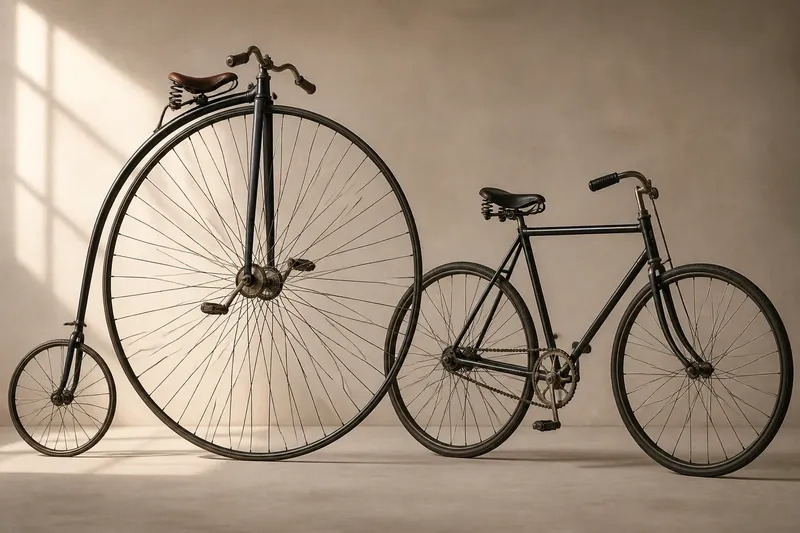
The safety bicycle changed the ride by lowering the rider and separating steering from propulsion. In the shift from penny-farthing to safety bicycle, a chain carried pedal effort to the rear wheel, while the front wheel could steer without also serving as the machine’s giant drive wheel.
Why did the penny-farthing put riders so high?
A penny-farthing, also called an ordinary bicycle, placed the pedals on the front-wheel hub. Turning the pedals turned that wheel directly, so a larger wheel covered more ground with each revolution. The tradeoff was a tall machine with the rider perched above the front axle.
That layout made mounting and stopping part of the challenge. Riders needed a practiced way to get onto the saddle, and a sudden stop could send the rider forward over the handlebars. At a slow pace, the high position could also make balance feel demanding.
The penny-farthing’s proportions followed its drive system: the front wheel had to be large enough to make each pedal stroke useful. The wheel was not an ornamental flourish; it shaped the rider’s position and the risks of everyday handling.
How did the safety bicycle change the ride?
The safety bicycle placed the rider between two wheels that were more similar in size. Its lower seat made mounting and pausing less precarious, while the two-wheel frame supported the rider without putting them directly above a huge front hub.
Cranks turned a chain, which drove a sprocket on the rear wheel. This separated the main jobs: the front wheel steered, the rear wheel received power, and the frame joined the wheels while supporting the rider. The chain let designers make the front wheel practical in size without tying pedal movement directly to its diameter.
This change did not make balance automatic or eliminate falls. It made the basic arrangement less dependent on a high perch and gave designers more freedom to shape the bicycle around the rider rather than around one oversized wheel.
What did the chain make possible?
A chain and sprockets linked crank rotation to rear-wheel rotation. By choosing sprocket sizes, designers could change how pedal movement related to wheel movement. The rider no longer needed a giant front wheel to gain useful travel from a pedal stroke.
That flexibility affected the whole outline of the bicycle. Designers could choose wheel size, frame shape, and rider position with fewer constraints from direct drive. The chain did add a part that needed attention: a dirty or poorly adjusted chain could make pedaling rough or allow it to slip.
When looking at a bicycle, trace the drive path from the cranks to the wheel. It reveals how the design turns effort into motion.
Why did the lower layout feel more manageable?
With the rider seated lower and between the wheels, mounting and stopping no longer required balancing high above a large front wheel. Rear-wheel drive also meant pedal force did not act through the steering wheel, so steering and propulsion had distinct roles.
Imagine a rider who has difficulty mounting a high-wheel bicycle and needs to pause on a crowded street. On a chain-driven safety bicycle, the lower seat makes mounting easier to attempt, and a stop is less likely to become a forward pitch over a giant front wheel. The expected difference is a more controlled pause, not a ride without risk.
The layout addressed particular handling problems; it did not remove the need to learn balance or use working brakes.
Which design details should you compare?
Use these observations to compare an old bicycle with a familiar modern one. Each result points to a different design tradeoff.
- Observe whether the rider sits high over the front hub or between the wheels; if the rider is perched above a large front wheel, expect mounting and stopping to demand more care, otherwise inspect how the frame supports a lower position.
- Observe whether the pedals turn the front wheel directly or drive a chain; if they turn the wheel directly, the wheel’s size governs the drive, otherwise trace the chain to the rear sprocket.
- Observe which wheel steers; if the driven wheel also steers, expect pedal force and direction to meet at the front, otherwise note that steering and propulsion have separate roles.
- Observe whether the chain is present and aligned; if it appears loose or displaced, treat the bicycle as needing inspection before riding, otherwise check how its sprockets connect the cranks and rear wheel.
- Observe how the bicycle stops and whether its controls are reachable; if the stopping mechanism or controls are unclear, do not assume it is ready to ride and ask a qualified bicycle mechanic to inspect it, otherwise note how braking fits the overall layout.
- Observe whether the wheels are close in size or sharply different; if one wheel is much larger, ask what job requires that proportion, otherwise examine how the frame positions the rider between them.
What do readers often ask about the safety bicycle?
Did the safety bicycle have two equal wheels?
Its wheels were more similar in size than a penny-farthing’s, but exact equality was not the defining feature. The bigger shift was that a huge front wheel was no longer needed to make direct pedaling useful.
Did the chain make the bicycle faster?
A chain allowed designers to choose a drive ratio, but speed depended on the setup, rider, and conditions. Its central design contribution was flexibility in connecting pedaling to a practical-sized rear wheel.
Was the safety bicycle automatically safe?
No bicycle layout removes the possibility of a fall or collision. The lower position and rear-wheel drive addressed specific difficulties of high-wheel riding, including its height and tendency to pitch the rider forward.
Why does the old design still matter?
It shows that a bicycle’s shape reflects decisions about where the rider sits, which wheel steers, and how pedal effort reaches the road. Those questions help explain unfamiliar designs without relying on a name or silhouette.
How can you read the design on a bicycle today?
Start with the rider’s position, then trace the drive from the cranks to a wheel. Check which wheel steers, how the frame supports the rider, and whether the brakes and controls are clear and reachable. Together, those details explain more than the bicycle’s outline alone.
The penny-farthing to safety bicycle shift is easiest to understand as a change in how the machine assigned its jobs. A lower rider position, front-wheel steering, and chain-driven rear propulsion created a layout that did not depend on a towering wheel to make pedaling useful.
When a bicycle looks unusual, follow the chain or other drive path before judging its proportions. That simple inspection can show why its wheels, frame, and rider position fit together as they do.