The Gear Checklist That Can Make a Short Ride Feel Complicated
A short-ride bicycle gear checklist helps you match essentials to your route, weather and plans, so you can leave prepared without packing for every possibility.
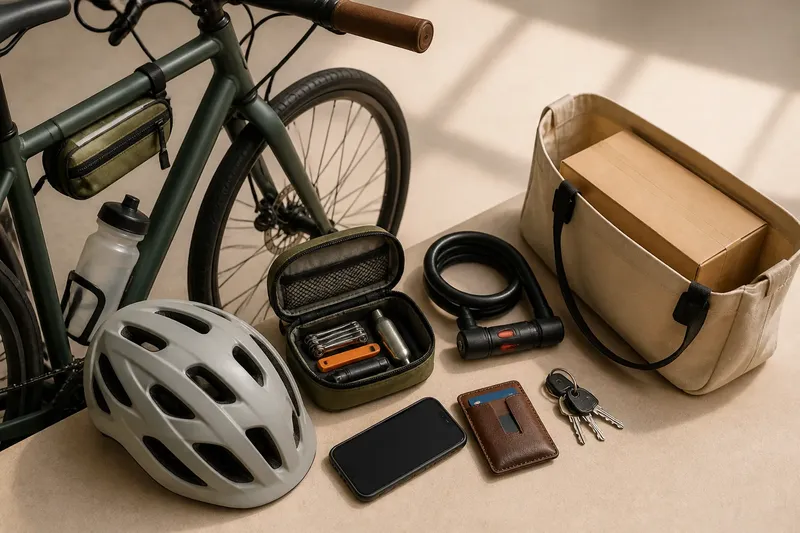
A short-ride bicycle gear checklist works best when it starts with a specific trip: where you are going, when you will return and what could change along the way. For a bakery run on familiar streets, a lock and payment method may matter more than a full repair kit; a late ride home calls for working lights. Choose gear by answering those practical questions, not by filling every pocket.
Build the decision around three kinds of need: keeping the bike safe to ride, staying visible and comfortable, and handling the stops or changes your plan could involve. A compact routine can catch a missing item without turning a quick departure into a packing exercise.
What should a short-ride bicycle gear checklist include?
Use the checks below as decision points. Each one links something you can observe to an action, so the list changes with the ride rather than growing by default.
- Bike condition: If a tire looks soft, a brake does not respond normally or the chain is not seated, fix the issue or postpone the ride; if the bike appears ready, move on to the route check.
- Light and visibility: If any part of the ride could happen in dim light or poor visibility, take working lights and suitable reflective details; if the whole trip is in clear daylight, use the visibility equipment that fits your route and local rules.
- Weather: If rain or cold is expected, add a layer or weather protection you can wear comfortably; if conditions are settled, leave bulky backup clothing at home.
- Route support: If the route has few places to stop or convenient help, carry repair supplies you know how to use; if shops or assistance are close and the ride is familiar, keep the repair load modest.
- Destination: If you will leave the bicycle outside a shop, bring a lock suited to the parking situation; if the bike stays with you, do not carry a lock without a reason.
- Errand needs: If the destination requires payment, identification or space for a purchase, carry the relevant item or bag; if the ride is purely recreational, leave errand-specific gear behind.
- Possible delay: If a late return could leave you without the lighting or clothing you need, add the appropriate item or change the plan; if timing is firm, do not pack for an unlikely overnight-length outing.
Imagine you plan a short ride to pick up a parcel on a mild afternoon. The invented starting conditions are a familiar paved route, a shop where the bike must be parked outside, enough daylight for the planned return and a parcel too large for a pocket. First, check the tires, brakes and chain; if they appear ready, leave the repair tools you cannot use at home. Next, confirm the return timing and forecast; with daylight and settled weather expected, skip extra lights and rain gear, but take your usual visibility equipment. Finally, pack a suitable lock, payment and a small carrier for the parcel. The resulting choice is a compact load shaped by the actual errand; if the shop visit might run into darkness, working lights become the deciding addition.
How should your routine change across the week?
Keep everyday gear in a consistent place, such as a small pouch or a hook near your helmet, then check the conditions before each ride. That separates items you use routinely from additions that only make sense for a particular route or forecast.
What belongs in a regular setup?
Keep a suitable helmet, your usual way to carry keys and payment, and lights if your schedule or routes call for them. A basic repair option can stay with the bike if you know how to use it and it is compatible with your tires and components; check the maker’s instructions when compatibility is unclear.
What can you leave behind on a familiar errand?
Leave out equipment for conditions the trip does not present. A large repair kit, spare clothing or extra food may not suit a brief ride near home in settled conditions, while a phone or payment method may be essential to the errand.
What should change when the forecast shifts?
If rain, cold or fading light becomes likely, add the relevant layer, weather protection or lighting before leaving. If conditions exceed what your equipment and experience can reasonably handle, shorten or postpone the ride instead of trying to compensate by carrying more.
What should you reset after riding?
Return reusable items to their usual places and note anything that needs attention, such as a light that needs charging or repair supplies you used. Dry damp clothing before putting it away, and replenish a pouch so it is ready for the next ride.
Should gear go on the bike or in a pocket?
Choose a carrying place based on what the item does and how often you need to reach it. A small saddle bag or frame pouch can hold compatible repair supplies, while a pocket or handlebar bag may make a phone, keys or payment easier to retrieve.
Secure anything attached to the bicycle, keep it clear of moving parts, and check that it does not interfere with steering, braking or getting on and off. Loose objects can shift or fall, and an overfilled pocket can distract you while riding.
For a shop stop, a lock may matter more than a broad selection of tools. For a route with little convenient help, repair supplies may earn their place instead. Let the planned stops and available support settle the tradeoff.
How do route and timing change the list?
Distance alone does not tell you what to carry. A familiar street route may offer places to stop, while a similar-length ride on a quiet path may leave fewer easy options if a problem arises. Check where you can pause, whether your destination has suitable bike parking and how you could return if plans change.
Timing can change the gear decision just as much. If an errand might run late, take working lights or choose a return plan that avoids riding in dim conditions; if the schedule and daylight are clear, there may be no reason to carry a second set of clothes.
Check local rules and equipment-maker instructions where they affect what is required or compatible. If you are unsure whether a light or other item meets a local requirement, ask an appropriate local authority or qualified bicycle professional.
What should you ask before adding another item?
What specific need does it address?
Name the condition, stop or possible change it is meant to handle. If you cannot name one, leave the item out unless the route makes that possibility consequential.
Can you use it if needed?
A tool only helps if it suits your bicycle and you know how to use it. For unfamiliar mechanical work, arrange help rather than relying on equipment you cannot operate.
Will it stay secure and comfortable?
Check how the item sits in its pocket, bag or mount before riding. If it shifts, catches or distracts you, change how you carry it or leave it behind.
Would a realistic change of plan make it necessary?
Consider a likely delay, a dark return or a stop where you will leave the bike unattended. Add the item that addresses that particular change instead of packing for every possible interruption.
How can you keep preparation proportional?
Use this sequence: check the bike, check the conditions, then check the plan. A tire or brake concern calls for attention before riding; a forecast of rain changes clothing; an outdoor stop may call for a lock. If none of those checks points to an extra item, keep the load as it is.
After the ride, use what happened to adjust future choices. If you carried a layer you did not need, decide whether the forecast still made it a sensible precaution. If you repeatedly needed an item you left behind, add it to the routine only for rides with the same condition.
A useful short-ride bicycle gear checklist makes each choice easier to explain: the item addresses a bike issue, a visibility or weather need, or a real part of the plan. Keep the essentials together, add only what the route calls for, and make a last check of anything that could change before you return.